HandiWine
|
Installation Before starting, make sure your Pocket PC device is connected to your desktop computer using Active Sync. Place the CD purchased into the CD drive on you computer. If the setup program does not start within a minute, use Windows Explorer to run the ‘Setup’ program on the CD. Follow the on screen instructions to complete the installation on your Pocket PC device. |
||
|
|
|
|
|
|
Starting
HandiWine |
|
|
|
On your Pocket PC, select ‘Programs’ from the main menu then scroll down to the HandiWine icon. Click the icon to start HandiWine |
|
|
|
|
|
|
|
After
Starting |
|
|
|
|
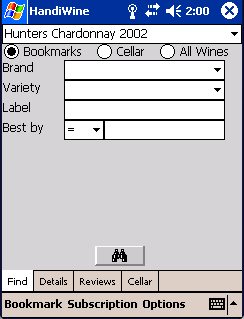
After verifying the database HandiWine displays the ‘Find’ screen and shows wines that have been previously book marked. If no wines are book marked the list at the top of the screen will show ‘New’. On the ‘Find’ screen ‘New’ is synonymous with ‘Nothing Found’. To add a new bookmark select ‘Bookmark’ (bottom left of screen) ‘Add’. To remove an existing book mark select ‘Bookmark’ ‘Remove’. To remove all book marks select ‘Bookmark’ ‘Remove All’. |
|
|
|
|
|
|
Initial
Setup |
|
|
|
|
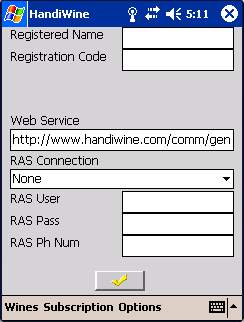
From the ‘Options’ menu, select ‘Subscriptions Settings’ and enter your name in the ‘Personal Id’ field. This name is used when you enter you personal wine reviews. If you purchase the optional subscription you will be provided with an ‘Application Id’ to enable the subscription. You should ensure that your Pocket PC has access to the internet by using ‘Pocket Internet Explorer’ before trying to use the ‘Subscription’ option. |
|
|
|
|
|
|
Find a Wine or Wines |
|
|
|
|
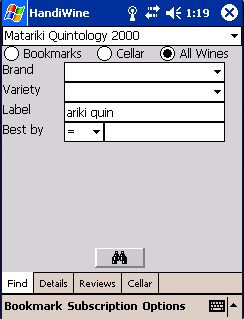
To find a wine go to the Find screen. Select where you want to find the wine from ‘Bookmarks’, ‘Cellar’ or ‘All Wines’. Enter what you want to find by either selecting from a drop down list (Brand and Variety are shown) or entering full or partial words in either the ‘Label’ or ‘Best By’ fields. In the case of the ‘Best By’ field you can also select an arithmetic operator, currently showing ‘=’ from the drop down list. When selecting from a list you can type the first few letters of the item you want to quickly locate items in a large list. When finding wines in your cellar, you can enter ‘Location’ and ‘Quantity’. Note that ‘Quantity’ is for individual cellar locations. Press the ‘Find now’ button to start the search. All matching wines will appear in the top most drop down list. |
|
|
|
|
|
|
View
and Edit Wine Details |
|
|
|
|
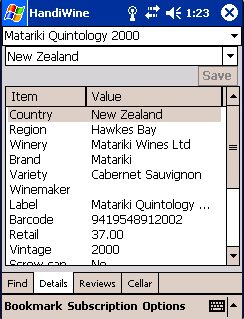
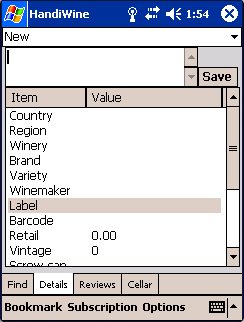
To view a wines details go to the details screen. This lists the wines detailed information. By selecting an item of interest the information will be displayed near the top of the screen. To edit the wine details, simply edit the text showing the detail information. When the text is changed the ‘Save’ button will become available to save your changes. Nothing is saved until the ‘Save’ button is pressed. If you make changes and then select another wine you will be asked if you want to save your changes. |
|
|
|
|
|
|
Add,
Edit, Delete and View Reviews |
|
|
|
|
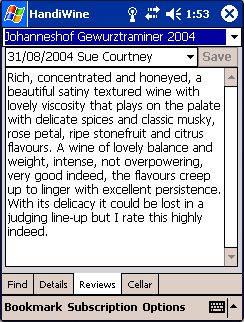
Find a wine and then select ‘Reviews’ and the latest review will be shown. To see other reviews select from the ‘review date and reviewer’ drop down list. To add a review, select ‘New’ from the ‘review date and reviewer’ drop down list, enter your review and click ‘Save’. To enter a blind review (before you know which wine it is), select ‘New’ from the top drop down list, enter your review and click ‘Save’. The review will be shown in the reviews with ‘[No Wine]’. You can then select the wine the review is for, select the review and click ‘Save’ to save the review for that wine. To ‘Edit’ your review, select it, make your changes and click ‘Save’. To ‘Delete’ your review, select it, remove all the text and click ‘Save’. |
|
|
|
|
|
|
Add
a New Wine |
|
|
|
|
Go to the ‘Details’ screen and select ‘New’ in the top most drop down list. Select each item you want to enter and either type in or select an option. Click ‘Save’ to save the new wine. |
|
|
|
|
|
|
Add
and Delete from your Cellar |
|
|
|
|
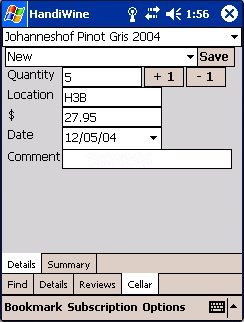
Find the wine you want to add to your cellar and select ‘Cellar’ and ‘Details’. Enter the quantity, location and optionally the per bottle purchase price. The date will default to today. You can add comments such as retail outlet name in the ‘Comments’ field. Click ‘Save’ to save the wine to your cellar. You can save the same wine to different cellar details, i.e. different locations. Use the date and location drop down list to view the cellar details for the selected wine. You can save wines in your cellar with 0 quantity. To remove a wine completely from your cellar, clear both the quantity and ‘Location’ fields and click ‘Save’. To view a summary of the wines in your cellar, select ‘Summary’. |
|
|
|
|
|
|
Subscription |
|
|
|
When you subscribe to HandiWine updates you will receive and ‘Application Id’ which is entered in on the ‘Options’ ‘Subscription Settings’ screen. You should verify that your Pocket PC has internet access using ‘Pocket Internet Explorer’ before trying to use the subscription service. Once subscribed to the subscription service you can download updates anytime and as often as you like. |
|
|
|
|
|
|
|
Options |
|
|
|
The ‘Options’ menu has other settings you can use to customise how you want HandiWine to work |
|
|
|
Subscription Settings: This is where you enter the subscription ‘Application Id’, your name in ‘personal Id’ for reviews you enter and how you want your Pocket PC to connect to the internet. Under most circumstances the ‘RAS Connection’ should be set to none. Search Settings: This is where you can change how you find wines on the ‘Find’ screen. Backup: This makes a copy of your HandiWine data to ROM or removable storage. A backup is automatically done before updating using the subscription service. In the event that you Pocket PC device is ‘Cold Booted’ your backed up HandiWine data can be restored. Restore: Restore is used to recover your backed up HandiWine data. This option is not available if HandiWine cannot find the backed up data. You can use this to restore HandiWine data after reinstalling HandiWine. Upload Cellar: When this option is selected your wine cellar information will be backed up to HandiWine.com when using your subscription. To turn this off, select ‘Upload Cellar’ again. Auto SIP: SIP is the Pocket PC Soft Input Panel, the small keyboard that appears across the bottom of the screen. Turning this option on will make the SIP appear whenever you can type text. Keyboard: When selected, this displays a larger full screen keyboard. This option is only available when you can type text in. Exit: Selecting this option exits the application. You do not normally need to do this because your Pocket PC will stop HandiWine if necessary when it isn’t in use. |
|
![]()